• Typpz Blog Facebook
  • Typpz Blog Twitter
  • Typpz Blog LinkedIn
  • Typpz Blog Flickr
  • Typpz Blog GitHub

Typpz Blog

  • Downloads
  • Contact
  • About
  • Navigation

Create the web 2.0 reflection effect with Adobe Illustrator

beta logo

Few days before, I wrote a tutorial on how you can build a web 2.0 logo with Adobe Photoshop. Here is another one for adding the reflection effect in a logo (like mine above) using Illustrator, which makes the reflection more flexible and easy to scale and manage. Open your logo in Adobe Illustrator and follow these steps:

  1. Duplicate your image by pressing alt (command for Mac) and clicking it. Drag it down (pressing the “shift” key while dragging helps for keeping your image aligned) so it looks like the one below.

    beta1

  2. Select the original object and click object>lock>selection to lock it.
  3. Select the duplicated object and click object>transfrom>reflect. Choose horizontal with 0 angle. Move the duplicated logo exaclty below the original one.
  4. Select the rectangle tool and draw a rectagle that covers the reflected image like in the screenshot below (color does not matter).

    beta2

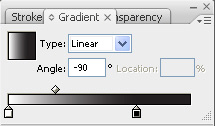
  5. Fill the rectagle with a white-to-black gradient, set angle to -90 and point color points like in the screenshot.

    beta3

  6. Select the gradient rectangle and the reflected image by pressing control+A (command+A for Mac) as the original object is locked and apply a transparency mask by clicking on the arrow in the upper right of the Transparency tab.

    beta4

    beta5

  7. Drop down the transparency opacity to 40-50% to make the effect more realistic and your reflection is ready!

    beta6

Note that making the reflection with Adobe Illustrator has nothing to do with the background color (like in Photoshop). Follow the same steps for applying it on dark backgrounds.

Share this:

  • Share
  • LinkedIn
  • Twitter
  • Facebook
  • Google
  • Reddit
  • Tumblr
  • Pinterest
  • Pocket

Related

Tagged on: adobe, beta, design, guide, illustrator, internet, logo, Photoshop, tutorial, Web 2.0
By Nikos M. | May 12, 2007 | Illustrator Tips, Web 2.0 | 16 Comments |
  • ← Create text logos using Adobe Photoshop
  • Digg effected! →

16 thoughts on “Create the web 2.0 reflection effect with Adobe Illustrator”

  1. Pingback: Gradients for shiny web 2.0 logos

  2. vladut June 26, 2007 at 5:44 am

    Thank you! I knew how to do reflection in photoshop, but not in ai.

    great tutorial!

    Reply ↓
  3. sebastian October 21, 2007 at 9:55 am

    Awesome! I have been trying to figure out how to make the reflection effect for a long time on my own but never could figure it out. Thanks for the tutorial. Found it in a google search after fiddling with ai.

    Reply ↓
  4. Pingback: Capatpin » Create the web 2.0 reflection effect with Adobe Illustrator

  5. josiah jost December 18, 2007 at 1:00 am

    thanks a ton man!! Great tute.

    Reply ↓
  6. Tiffany July 2, 2008 at 9:10 pm

    Great! Thank you, quick and easy!

    Reply ↓
  7. DK August 22, 2008 at 8:47 pm

    Thanks a ton. Very useful indeed.

    Reply ↓
  8. sandra November 26, 2008 at 12:42 am

    that’s awesome. great tip. thank you!

    Reply ↓
  9. GU December 16, 2008 at 3:30 pm

    Thank you for your good job!

    Reply ↓
  10. sasdaman July 20, 2009 at 5:28 pm

    Very nice and simple effect! thanks

    Reply ↓
  11. el_chejin November 23, 2009 at 10:37 pm

    Really nice, I didn’t knew that something like that could be done.

    Reply ↓
  12. Adam January 19, 2010 at 2:48 am

    I’ve tried doing this in photoshop by following other tutorials and have always felt overwhelmed. This is by far the simplest method I think, and you explain it very well for laymen like me. Thanks!

    Reply ↓
  13. AR August 12, 2010 at 2:13 pm

    Thanks! great tips – simple, easy and really well explained! rock on!

    Reply ↓
  14. jonny December 15, 2010 at 5:06 pm

    Thanks so much. This was easy and straightforward. I’ve had Illustrator for 5 years and could never do this outside of photoshop or InDesign. Go figure. Thanks, you’re a lifesaver.

    Reply ↓
  15. Rob July 12, 2011 at 12:24 am

    Thanks! What an easy to follow tutorial. Four years later and still applicable.

    Reply ↓
  16. Pingback: E9}

Leave a Reply Cancel reply

Your email address will not be published. Required fields are marked *

This site uses Akismet to reduce spam. Learn how your comment data is processed.

Recent Posts

  • First time at WWDC July 2, 2017
  • WWDC 2016 developer round up July 3, 2016
  • Extending Swift Arrays January 24, 2016
  • What I expect from WWDC15 April 19, 2015
  • WatchKit: Table and network fetch March 15, 2015
  • Popular
  • Comments
  • Latest
  • Today Week Month All
  • iOS SDK: Create a Pop Up window
  • iOS SDK: Pop up window in Swift
  • Xcode 5: Test UITableView with XCTest framework
  • How to: Find original photo files in iPhoto
  • iOS SDK: animations and effects in UIImageViews
  • First time at WWDC
  • WWDC 2016 developer round up
  • Extending Swift Arrays
  • What I expect from WWDC15
  • WatchKit: Table and network fetch
  • Today Week Month All
  • Sorry. No data yet.
Ajax spinner

Top Posts & Pages

  • iOS SDK: Create a Pop Up window
  • iOS SDK: Pop up window in Swift
  • How to: Find original photo files in iPhoto
  • Xcode 5: Test UITableView with XCTest framework
  • How to: Fix the "Base SDK missing" issue in Xcode
  • Create a skype-like logo using Adobe Photoshop
  • Create a simple PHP script and MySQL database for user authentication.
  • Digg effect: Advantages and disadvantages
  • How to: Create an icon for your app in Mac OS X
  • Extending Swift Arrays

Categories

  • Apple Mac (41)
  • Cards (1)
  • General (58)
  • Illustrator Tips (2)
  • iOS development (15)
  • News (33)
  • Photoshop tips (13)
  • Printing (1)
  • Reviews (13)
  • Web 2.0 (34)
  • Web Design Tips (28)

Archive

Subscribe to Blog via Email

Enter your email address to subscribe to this blog and receive notifications of new posts by email.

Join 21 other subscribers


License

Creative Commons License
This work is licensed under a Creative Commons Attribution-Share Alike 3.0 Unported License.
Privacy & Cookies: This site uses cookies. By continuing to use this website, you agree to their use.
To find out more, including how to control cookies, see here: Cookie Policy

About me

myself I am a software engineer living in Athens, Greece. I currently work as an iOS developer. I love technology, music and simplicity. In this blog, I write mainly about my experience with the Apple ecosystem, but I also pick random topics from time to time.

Follow me on Twitter

My Tweets

Tags

adobe ajax apple blog browser css design firefox guide internet ios ios sdk iphone ipod linux logo mac macintosh macos mac os x microsoft mobile mozilla notebook objective-c os x Photoshop php review Reviews safari sony swift tutorial typpz unix web Web 2.0 web design windows wordpress wwdc www xcode XML
Copyright © 2019 Typpz Blog | Powered by: WordPress
Back to Top